How to Connect
TAMU Users
SSH
To connect to HPRC clusters, you must use SSH (Secure Shell). SSH is a client-server software that provides for secure (by encryption) logins and other communication between two hosts. SSH is freely available on the Internet for Linux/Unix and PC Windows (in the guise of MobaXterm).
To initiate SSH connection to target cluster's login node, find the hostname (terra/grace) and credential (userID/password) info from Table 1 below. For example, if you are connecting to Grace cluster from a terminal enter:
[user1@localhost ~]$ ssh NetID@cluster.hprc.tamu.edu
where the grace.hprc.tamu.edu address is a DNS round-robin alias for grace[1-4].tamu.edu. You will be prompted for your password in order to establish authentication. Once you login into one of the login nodes, the shell's prompt will be [NetID].grace[1-8]. If, however, you are connecting for the very first time, you will see a message similar to the following before arriving at the password prompt:
The authenticity of host 'grace (165.91.16.18)' can't be established.
ECDSA key fingerprint is SHA256:SfQPtDJW30sj4kG2c4KGFw7LcEduSOFeXGIlsf4WhEA.
ECDSA key fingerprint is MD5:9c:ea:ba:22:0f:6f:1e:b9:0c:21:d4:b6:70:0f:a0:d5.
Are you sure you want to continue connecting (yes/no)?
Type yes and you will then be presented with the password prompt.
Warning: Permanently added 'grace' (ECDSA) to the list of known hosts.
NetID@grace.hprc.tamu.edu's password:
| Cluster | Hostname | Number of login nodes | Credential (UserID / Password) |
|---|---|---|---|
| FASTER | faster.hprc.tamu.edu | 2 (faster1 ~ faster2) | NetID / NetID password |
| Grace | grace.hprc.tamu.edu | 4 (grace1 ~ grace4) | NetID / NetID password |
| Terra | terra.hprc.tamu.edu | 3 (terra1 ~ terra3) | NetID / NetID password |
Table 1: Hostname and credential information for the HPRC clusters (NetID login).
Off-campus
For connecting to cluster login nodes from outside the campus, you need to activate Virtual Private Network (VPN) first, then initiate SSH connection to the cluster login nodes. You can find VPN installation instructions from TAMU ServiceNow Knowledge Base page on VPN.
WSL and Windows Users Attention: If the above off-campus access method does not work, the following options are available:
-
Download the Cisco AnyConnect client from the Microsoft Store. Credential entry will be identical to logging into other TAMU resources utilizing CAS authentication.
-
PowerShell: you will use syntax similar to when you use WSL. For example: To access Grace, you will use "ssh [NetID]@grace.hprc.tamu.edu"
-
Shell Access via the portal: you will access portal.hprc.tamu.edu and choose portal (Grace or Terra. On the top bar, choose "Clusters" then choose the "Shell Access" option.
Two-Factor Authentication
Two-factor authentication via Duo is required for Texas A&M NetID authentication. Additional information on how to setup Duo can be found at https://it.tamu.edu/duo/
Duo two-factor login for TAMU NetID:
Enter a passcode or select one of the following options:

 1. Duo Push to XXX-XXX-1234
 2. Phone call to XXX-XXX-1234
 3. SMS passcodes to XXX-XXX-1234 (next code starts with: 9)

Passcode or option (1-3):
Type 1, 2, or 3 or use your Yubi key based on the method of Duo that you setup. After successfully using Duo two-factor authentication, you will see the following message Success message and greeted with the Message of the Day (MOTD) and finally an active prompt:
Success. Logging you in...

Message of the Day Text
...

[NetID@cluster]$
FAQ
- My account is locked after several login attempts, what can I do?
Your account will be locked after 7 failed login attempts. It will be automatically unlocked after 10 minutes. Please refer to above sections for updated instructions on how to use SSH, SFTP clients with duo authentication enabled.
Windows
MobaXterm (Recommended)
MobaXterm is an enhanced terminal for Windows with a built-in X11 server, tabbed SSH client, built-in file editor, SFTP functionality, and other useful features. You may download MobaXterm from: http://mobaxterm.mobatek.net/download.html
You will need to choose which license (free Home edition, or professional) and then select the Portable or Installer edition. The Installer edition works best on your personal machine, when you have the privileges to install software. The portable version may be necessary when using a lab workstation, for example. (Be sure to check if MobaXterm is already installed in the Windows Start menu.)
Configuration
You may create saved sessions for connecting to grace.tamu.edu or other HPRC clusters, for your convenience. See http://mobaxterm.mobatek.net/documentation.html#1_2 for instructions. For example:

IMPORTANT: When asked if you would like to save your password, choose "No" to avoid potential security exploits or getting locked out of the system when your password is changed.

Two-Factor Authentication
-
On the top left corner of MobaXterm window, click 'Session' button.

-
You will be prompted with a window which asks for your session settings.
-
Enter the 'Remote Host' (e.g. grace.hprc.tamu.edu, terra.tamu.edu, etc.) you would like to connect to.
-
Select 'Specify', then enter your username (your NetID).
-
Enter the 'Port Number' 22 (the default should be 22).

-
Press enter.
-
You will be prompt to authentication with Duo (either using mobile app, text message or call).
-
If you wish to open the session again, open the 'Session' tab on the left side of the screen and double-click the appropriate session to launch.

File Transfer
-
On the top left corner of MobaXterm window, click Session button.
-
Choose 'SFTP' session type.
-
Enter remote host (e.g. grace.tamu.edu, terra.tamu.edu, etc.) and username (your NetID).
-
Go to 'Advanced Sftp settings' and check '2-steps authentication' checkbox.
-
After you select 'Ok', you will be prompted with Duo Authentication method (Push, Call, Text, Second device, etc). Select the appropriate option. Do not type your TAMU password.
Example Duo Authentication methods (You won't see this, it is just to remind you of the format of Duo Authentication options)
Enter a passcode or select one of the following options:

 1. Duo Push to XXX-XXX-1234
 2. Duo Push to iOS
 3. Phone call to XXX-XXX-1234
Your Duo settings will be different
File Transfers
On the left-hand side of the MobaXterm window, different tabs are available. The labels are written vertically. Choosing the "Sftp" tab will display a file tree of the remote machine to which you are connected, such as:

You may choose files to edit with the built-in editor. You may also transfer files from your Windows machine to the remote cluster, and vice versa. Just drag a local file (from a Windows File Explorer window or similar program) to the SFTP file tree on the left side of the MobaXterm window.
Remote Graphics
By default, MobaXterm connections have X11 forwarding available. So, when you connect to grace.tamu.edu or other machine, you should be able to run an X-Windows program by simply typing the command. That will open the program in a new window behind the MobaXterm main window.
OAL Workstations
Verify MobaXterm is installed
After logging in to Open Access Labs (OAL) workstation, click on the magnifying glass to search for an installed program. As you start typing "MobaXterm", matching programs will be displayed on the left-hand side of the screen, above the search field.

Once you have started MobaXterm, click "Start local terminal" (as pictured above in Local Terminal section). You may encounter an error such as the following:

To solve this problem, you will need to change the location of the virtual "root" and "home" directories. At the top of the MobaXterm window in the row of buttons, click "Settings" (the second to last on the right-hand side):

A settings dialog will open. By default, the virtual root and home directories will be set to "_MyDocuments_\MobaXterm" which lacks proper write permissions for the OAL workstations:

Change both of these by clicking on the current values (with the little yellow folder on the right-hand side). Scroll up to find the "Temp" folder, which is under the "C:" drive:

Once both have been changed, they should look like this:

Once you click "OK", MobaXterm will need to restart to commit these changes:

MacOS
Terminal Program
Find the Terminal program under Applications->Utilities.
On your Mac click the Finder  icon
to start finder:
icon
to start finder:
- Select Applications

- Double click the Utilities folder
- Double click the Terminal utility

- A Terminal window will now appear.
- Connect to the cluster using SSH.
Remote Graphics
The recommended X-Windows emulator for Mac OS X is XQuartz, which is available for free from the XQuartz Project.
- After XQuartz is installed on your system, start XQuartz.
- An xterm window should appear on your screen.
- Login to the desired cluster (example:
grace.tamu.edu). ssh -X NetID@grace.tamu.edu The-Xoption tells SSH to allow programs to forward and display their graphical interfaces. This is known as X11 forwarding. - To verify that X11 forwarding is working, type the following command: xterm If a new xterm terminal window for the remote system pops up, then X11 forwarding is working correctly.
Linux/Unix
OpenSSH is an SSH v1.x and v2.x compliant SSH package that is available for many Linux and Unix operating systems and is " ...freely usable and re-usable by everyone under a BSD license... ". OpenSSH also includes secure copy (scp), which may be used instead of ftp. It is available from: ftp://ftp.openssh.com/pub/OpenBSD/OpenSSH/portable/.
Terminal
If you are using a UNIX based system (IRIX, Linux, SunOS, etc), open a terminal window and connect to the cluster using SSH.
Remote Graphics
Typically, if you use a graphical login screen to login a Linux or Unix system, then the system is already running a X11 server. You will need to login with SSH to the cluster in a slightly different manner:
ssh -X NetID@grace.hprc.tamu.edu
The -X option tells SSH to allow programs to forward and display their
graphical interfaces. This is known as X11 forwarding. To verify that
X11 forwarding is working, type the following command:
xterm
If a new xterm terminal window for the remote system pops up, then X11 forwarding is working correctly.
ACCESS Users (XSEDE)
External users (non-TAMU) can apply for an ACCESS ID to gain access to HPRC FASTER and ACES resources. See the Resource Provider (RP) page in the ACCESS documentation to learn how to apply.
Portal
ACCESS users can login to FASTER through the ACCESS FASTER Portal
https://portal-faster-access.hprc.tamu.edu
ACCESS users can login to ACES through the ACES Portal
https://portal-aces.hprc.tamu.edu
SSH
FASTER:
As of August 31st, ssh login to FASTER for ACCESS users transitioned from the XSEDE sso hub to the faster jump host.
[user@localhost ~]$ ssh -J [username]@faster-jump.hprc.tamu.edu:8822 [username]@login.faster.hprc.tamu.edu
You can find your username under your ACCESS profile: https://allocations.access-ci.org/profile
Use of the jump host requires the generation of SSH Keys. Instructions to generate and submit the properly formatted SSH Keys are provided below.
ACES:
The ACES cluster does not currently support direct ssh login. Support for direct ssh login to ACES is planned. In the meantime, please use the Portal to login.
Windows
MobaXterm
MobaXterm offers the capability to use a jump host to connect to a server in a secured network zone. You can configure your SSH session to use a jump host to save time with the login process.
Use of the jump host requires the generation of SSH Keys. Instructions to generate and submit the properly formatted SSH Keys are provided below.
Click on the Session tab to create a new session. Next click SSH* in the top ribbon.
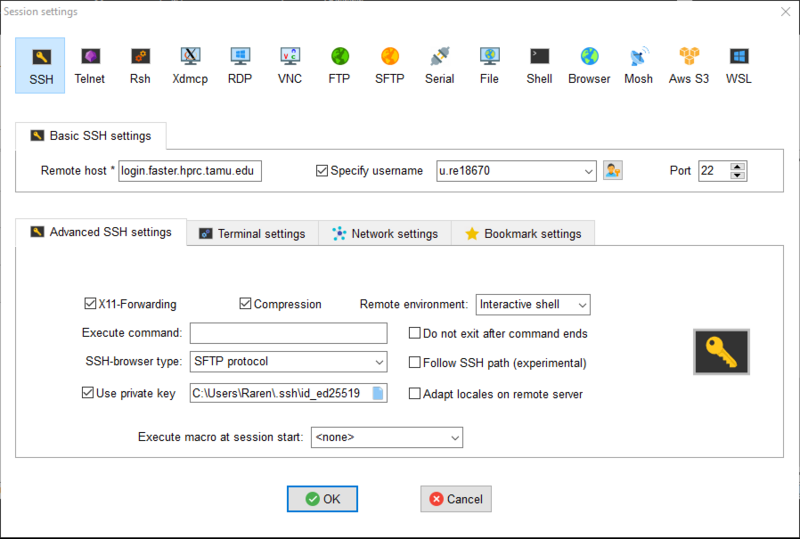
Enter login.faster.hprc.tamu.edu into the Remote host * box.
Enter your ACCESS username in the Specify username box.
Open the Advanced SSH Settings tab check the Use Private Key box. Then enter the path to your private key.
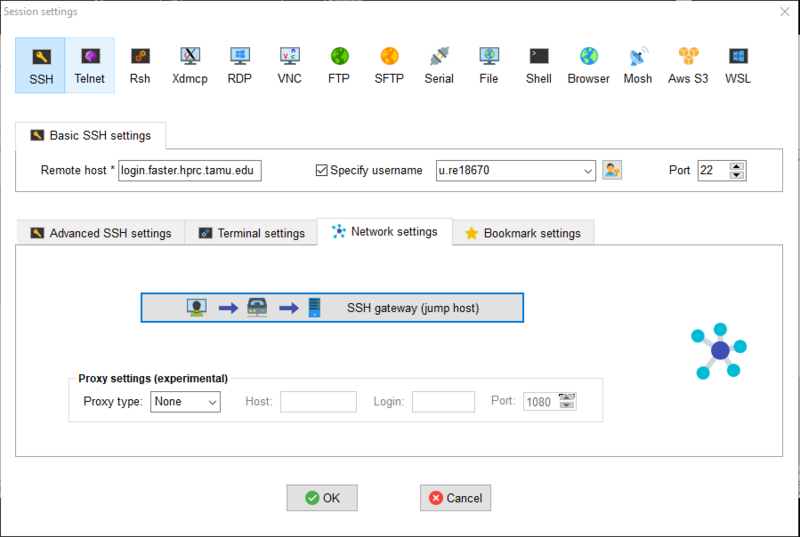
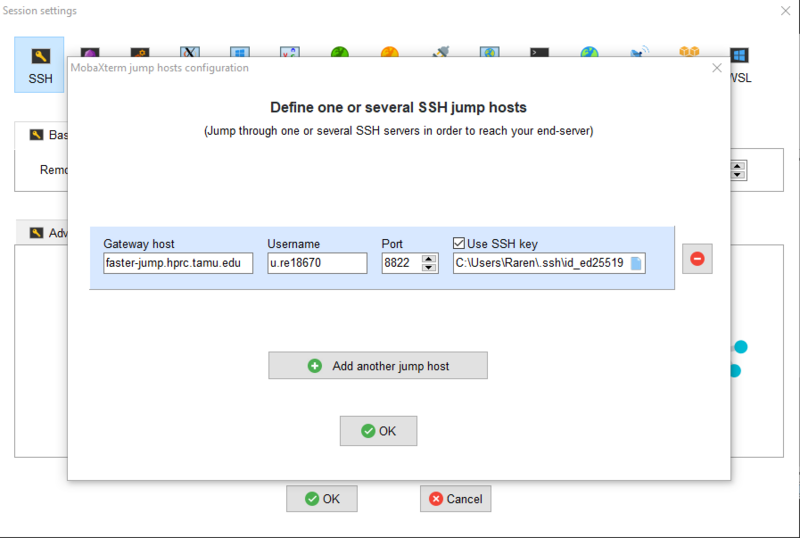
Go to the Network Settings tab and enable Connect through SSH gateway (jump host) and enter respective login data. The gateway host should be faster-jump.hprc.tamu.edu and port should be 8822. Click OK.
Start the session by double clicking the session login.faster.hprc.tamu.edu (username) in the left hand ribbon or under the Sessions tab.
SSH Keys
Generating
If you do not already have an ed25519 type key-pair you can use the below instructions to generate your ssh-keys on the host you will use to login from. The keys should automatically be generated in $HOME/.ssh/ Do NOT change the name of the generated keys or the location
Windows
Please use the Windows PowerShell to generate your keys.

Once you have launched the Windows PowerShell App type:
ssh-keygen -t ed25519
The command will output the following text:
 Generating public/private ed25519 key pair.
 Enter file in which to save the key (C:\Users\username/.ssh/id_ed25519):
If you already have a .ssh directory, the follow text will not be displayed.
Created directory 'C:\Users\username/.ssh'.
Hit Enter at the following prompt.
Enter passphrase (empty for no passphrase):
Hit Enter at the following prompt.
Enter same passphrase again:
More text output:
 Your identification has been saved in C:\Users\username/.ssh/id_ed25519.
 Your public key has been saved in C:\Users\username/.ssh/id_ed25519. pub.
 The key fingerprint is:
 SHA256:long_string_of_text_here
 The key's randomart image is:
(many lines of characters here)
Linux and Mac
Launch a terminal on your Linux or Mac system and type:
ssh-keygen -t ed25519
The command will output the following text:
Generating public/private ed25519 key pair.
Enter file in which to save the key (/home/abhinand/.ssh/id_ed25519):
If you already have a .ssh directory, the follow text will not be displayed.
Created directory '/Users/username/.ssh'
Hit Enter at the following prompt.
Enter passphrase (empty for no passphrase):
Hit Enter at the following prompt.
Enter same passphrase again:
More text output:
Your identification has been saved in /Users/username/.ssh/id_ed25519.
Your public key has been saved in /Users/username/.ssh/id_ed25519.pub.
The key fingerprint is:
SHA256:long_string_of_text_here
The key's randomart image is:
(many lines of characters here)
Submitting
The following link has basic instructions on how to login and upload your key:
Here are detailed instructions:
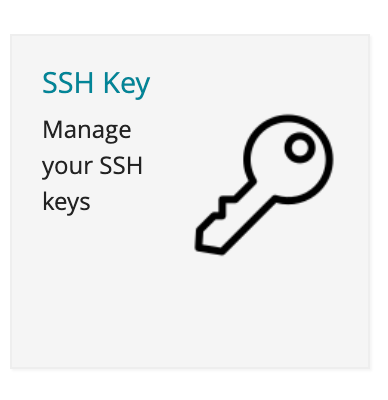
Login to: https://registry.access-ci.org/
Click on “SSH Key: Manage your SSH keys”:
Click on Add SSH Key in the upper right hand corner:

Click Choose File and navigate to the location of your id_ed25519.pub file and click on the open button. Depending on your operating system, you may need to make a copy of your id_ed25519.pub file to another directory if it is in a hidden folder.